Getting started
This page helps you understand how to correctly edit a .yml (.yaml) file. All of my plugins use .yml configuration files, which will reset themselves or stop working if you edit them incorrectly.
Below, you will find every configuration entry type and how they should be formatted if you are modifying any values!
How to edit .yml files
Files are stored in the .yml file format and Notepad++ is the recommended file editing software for configuration work. Of course you can use any other text editor of your choice.
Boolean
Boolean values are true or false. This is what they look like:
value1: true
value2: false
Booleans only ever accept either true or false values. They are usually used to turn specific features on or off.
String
String values are usually just normal text. It is highly recommended that you create String values between quotes, following this format:
value: "String"
While this is not always mandatory, it is mandatory for any string that contains color codes, especially if the first character starts with a color code. Color codes follow the in-game color code format meaning that "&aTest" would result in green text. The availability of colored text varies depending on the configuration setting. Check this page for color codes.
Details
Why?
Configuration strings can accept special characters such as&. If these special characters occupy the first character, such as in value: "&aString", if the String is not between quotes the value will be wiped and the config option will be reset to its defaults. This is a limitation of the configuration system that Spigot uses.Serialized Location
Serialized Location is a specific type of String which looks like this:
location: world,1.0,2.0,3.0,4.0,5.0
These are used to store and configure locations. It follows this format: worldName,X,Y,Z,PITCH,YAW. Pitch and yaw just determine the direction that the player is looking at, and is implemented the same way Minecraft locations are.
Multiplier
Multiplier values multiply plugin values by that number. These values should never be between quotes. Here's an example:
damageMultiplier: 1.0
In this case, the damage multiplier would be multiplied by 1, meaning that there is no change from the default value. If the Multiplier was 2.0, the value would be multiplied by 2.0. If it was 0.5, it would be multiplied by 0.5.
For those not good with fractions, multiplying by 0.5 is the same as dividing by 2. Multiplier values should always be larger than 0 (0.0001 is valid) and don't tend to have a higher ceiling.
Integer
Integer values are just whole numbers. Example:
value: 10
You can randomize these values for scripts by using ~. Example:
value: 1~10
The main thing about Integer values they must be whole numbers. This means that 10.1 is not valid.
Double
Doubles are decimal numbers that can have fractional components. Example:
value: 10.01
You can randomize these values for scripts by using ~. Example:
value: 1.0~10.01
Doubles can also happen to be whole numbers like integers, like 10.0 or even represented as 10.
Float
Floats are 32-bit decimal numbers with less precision than Doubles. Example:
value: 10.42452
You can randomize these values for scripts by using ~. Example:
value: 1.0~10.42452
Floats can also be whole numbers, like 10.0 or even represented as 10.
String List
String Lists are lists of String values. These tend to be the hardest values to configure, as they require a very specific config format:
valuesList:
- "value,1"
- "value,2"
- "value,3"
Like with Strings, it is recommended to keep the values between quotes. Each String List has its own format, so you'll have to find the specific format the one you're editing requires; however, globally, that is what the overall format should look like.
Map List
'Map List' are lists of 'Map' value. These are only used in elite scripting, and require this configuration format:
parentMap:
- Map1:
  key: value
- Map2:
  key: value
  keyForList:
    - "value1"
    - "value2"
As you can see, Map Lists can contain any kind of format inside them, but if you are using them in scripting you will need to refer to the documentation to see which are the valid keys and values for the different maps.
Color Codes
You can also assign colors or make text bold using the following modifiers:
| Code | Color | Example |
|---|---|---|
| &4 | Dark red | &4Dark red example. |
| &c | Red | &cRed example. |
| &6 | Orange | &6Orange example. |
| &e | Yellow | &eYellow example. |
| &2 | Dark green | &2Dark green example. |
| &a | Green | &aGreen example. |
| &b | Aqua | &bAqua example. |
| &3 | Dark aqua | &3Dark aqua example. |
| &1 | Dark blue | &1Dark blue example. |
| &9 | Blue | &9Blue example. |
| &d | Light purple | &dLight purple example. |
| &5 | Dark purple | &5Dark purple example. |
| &f | White | &fWhite example. |
| &7 | Gray | &7Gray example. |
| &8 | Dark gray | &8Dark gray example. |
| &0 | Black | &0Black example. |
| &r | Reset color | &rReset example. |
| &l | Bold | &lBold example. |
| &o | Italic | &oItalic example. |
| &n | Underline | &nUnderline example. |
| &m | Strikethrough | |
| &k | Random | &k &fexample. |
As you can see in the examples, the modifiers follow the regular minecraft syntax except that the § is replaced with a & when used with EliteMobs. You can use this to modify most EliteMobs text such as, mob names, quest text, dungeon names etc.
Take note that when working properly the modifiers themselves will not show in your text. They are only shown here for demonstration purposes.
It is also possible to combine colors and other text modifiers. For example, you can do:
If we wanted our custom mob to have a nice fancy colorful name we would do the following:
name: $normalBossLevel &aScary &dDragon
Material
Material values are just Materials that you can find in MineCraft, such as IRON_CHESTPLATE. For a list of valid Materials see this page.
helmet: IRON_HELMET
Materials are used as values in several settings such as equipment for mobs, loot drops, quest rewards etc.
Filename
Filename values are just .yml config files that are formatted to be used with MagmaGuy's plugins. These could be anything from items to quests.
uniqueLootList:
  - filename: magmaguys_toothpick.yml
Trimming Worlds
Sometimes, you may need to reduce the size of your Minecraft world to make it lighter and, consequently, easier to distribute. This can be achieved through the use of the WorldBorder plugin. Despite the plugin page showing older version support, WorldBorder typically functions on current MineCraft versions. Test in your environment to confirm compatibility.
Details
Tip
If you are doing this for the first time it might be a good idea to create a backup of your world just in case something goes wrong.Once the plugin is installed, navigate to the middle of the world or the specific area you wish to trim. Then, execute the command /wb set x, where x represents the approximate radius size you want for your area.
Details
Tip
If/wb is not working for you, try /worldborder:wb.After executing this command, fly to the edges of your world to verify that the world border has been properly set and covers the intended size. You will recognize reaching the world border edge when you are pushed back, accompanied by a message in the chat.
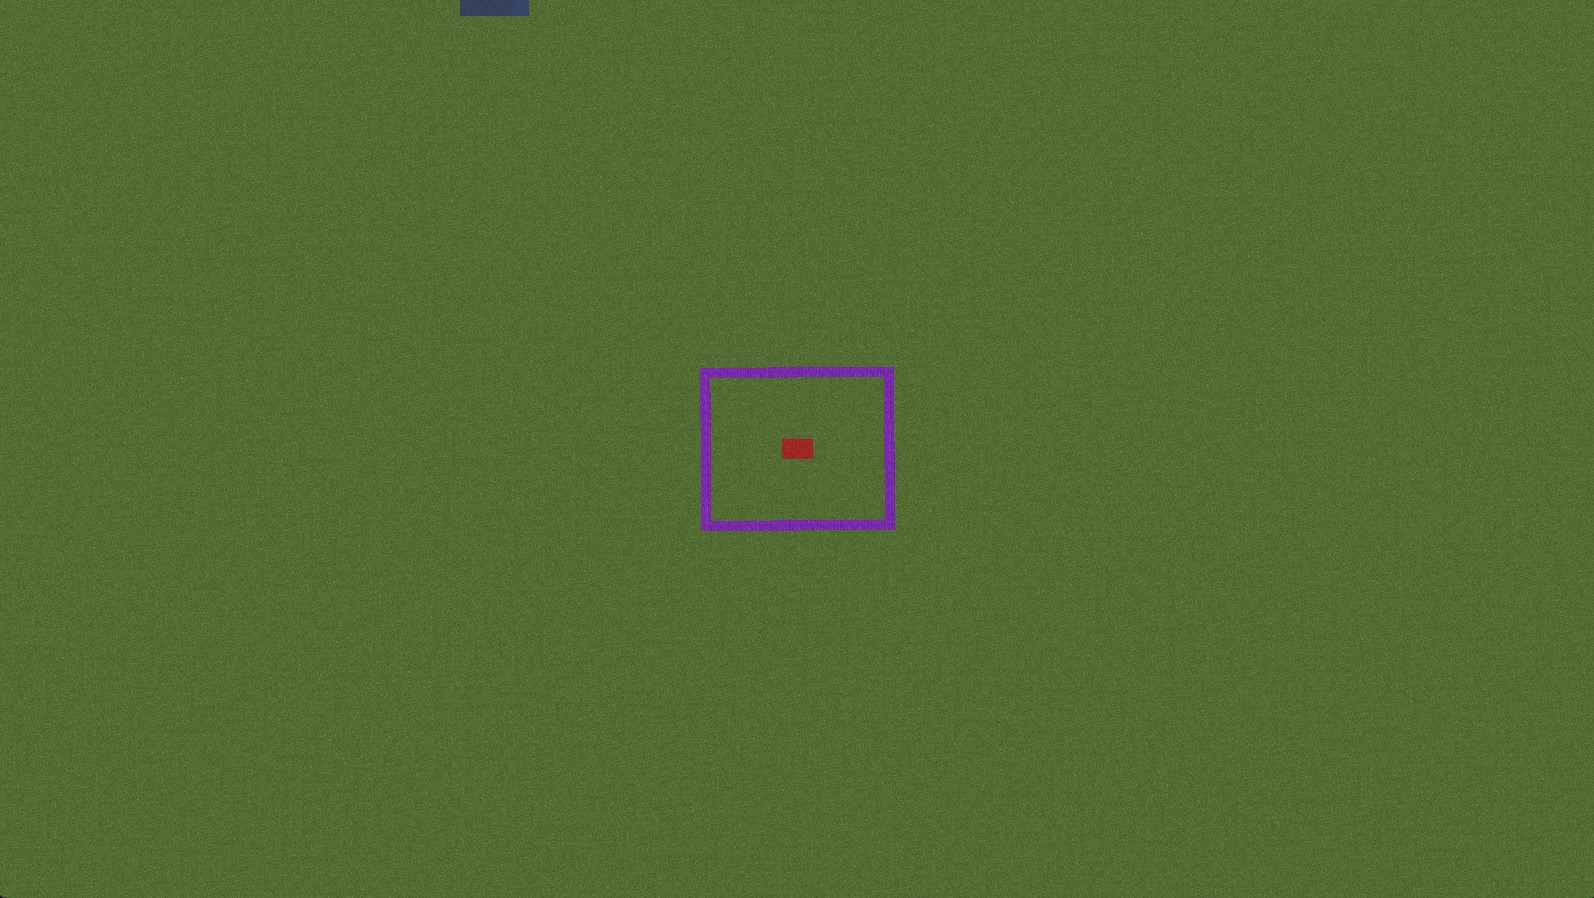
In the image above, we aim to trim the world around the purple blocks, leaving only a few chunks around them. To achieve this, we stand in the middle of the purple area on the red squares and execute /wb set 50, setting the world border just beyond the purple area.
Next, we use the /wb trim [freq] [pad] command, with the frequency set to 200 and the pad to 20. The pad determines how many chunks should be left around the world border (the purple area), and the frequency determines how many chunks should be processed per second. After running /wb trim 200 20, we will be prompted to confirm by executing /wb trim confirm. We confirm the action, and after some time, our world will be trimmed, reducing its size and making it more convenient for distribution.
You can now remove the world border using /wb clear all or just leave it if you wish.
Trimming the world folder
There are several files and folders located in your world folder that we can discard since the plugins do not use all of them. This will cut down the size of your world and make it easier to distribute.
For a NORMAL world Environment:
To prepare your world, keep the following files and folders:
- region folder
- raids.dat from within the data folder (ensure it's placed inside the data folder when copying)
- level.dat file
You can safely delete all other files and folders located in the world folder. This will set up your world correctly for the NORMAL environment.
For NETHER and THE_END world Environments:
To prepare your world, keep the following files and folders:
- region folder inside the DIM-1 folder (ensure it's placed inside the DIM-1 folder when copying)
- raids.dat from within the data folder (ensure it's placed inside the data folder when copying)
- level.dat file
You can safely delete all other files and folders located in the world folder. This will set up your world correctly for the NETHER and THE_END environments.