Criar Quests
Quest de Exemplo
O EliteMobs vem pré-instalado com um test_quest.yml, que será analisado aqui como um formato simples de quest a seguir.
As Quests Personalizadas ficam na pasta ~plugins/EliteMobs/customquests!
test_quest.yml
isEnabled: true
customObjectives:
Objective1:
amount: '1'
filename: test_boss.yml
objectiveType: KILL_CUSTOM
customRewards:
- filename=magmaguys_toothpick.yml:amount=1:chance=1
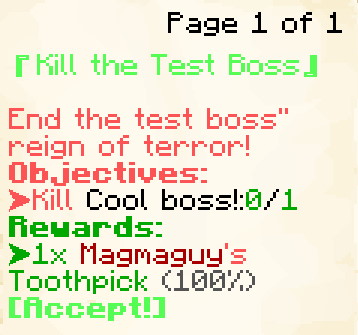
name: "&aKill the Test Boss"
questLore:
- "&cEnd the test boss'' reign of terror!"
Se a interface da tua quest não tiver este aspeto, podes alterá-la para corresponder usando /em alt.
Esta quest de exemplo dará aos jogadores a tarefa de derrotar 1 test_boss.yml. (O nome real do boss apresentado no rastreador de quests será o name: definido no test_boss.yml.) E, como recompensa por completar a quest, eles serão recompensados com 1 Magmaguy's Toothpick.
Criar Quests Personalizadas
isEnabled
Define se a quest está ativada.
| Key | Values | Default |
|---|---|---|
isEnabled | Boolean | true |
Exemplo
isEnabled: true
customObjectives
Define os objetivos da quest.
| Key | Values | Default |
|---|---|---|
customObjectives | Especial [1] | nenhum |
Nota: Se estiveres a usar um boss multifase como objetivo, o objetivo deve usar a primeira fase como alvo.
Exemplos
KILL_CUSTOM:
customObjectives:
  Objective1:
    amount: '1'
    filename: my_cool_boss.yml
    objectiveType: KILL_CUSTOM
DIALOG:
customObjectives:
  Objective1:
    dialog:
    - "&a[Dialog NPC] &fCome here often?"
    - "&7&oI should eat more apples."
    filename: dialog_npc.yml
    npcName: Dialog NPC
    location: at dialog location.
    objectiveType: DIALOG
FETCH_ITEM:
customObjectives:
  Objective1:
    amount: '99'
    itemName: Red Apples
    filename: my_quest_item_red_apples.yml
    objectiveType: FETCH_ITEM
ARENA:
customObjectives:
  Objective1:
    objectiveType: ARENA
    filename: my_arena.yml
    name: "Complete the Arena"

Especial [1]
Expandir Tabela
Os Objetivos Personalizados são construídos usando os seguintes valores:
| Key | Description |
|---|---|
KILL_CUSTOM / FETCH_ITEM / DIALOG / ARENA | Usado para definir o tipo de objetivo que isto representa. KILL_CUSTOM indica que a quest envolve matar um Boss Personalizado específico, FETCH_ITEM indica que a quest envolve obter um Item Personalizado específico, DIALOG indica que a quest envolve falar com um NPC, e ARENA indica que a quest envolve completar uma arena específica. |
filename | Usado para definir o nome do ficheiro do Boss Personalizado, do Item Personalizado que o jogador tem de matar / obter, do NPC com quem tem de falar, ou da arena que tem de completar. |
amount | Usado para definir a quantidade de Bosses Personalizados que devem ser mortos ou de itens que devem ser obtidos. Assume 1 por defeito se não for especificado. |
dialog | Usado para definir o diálogo do NPC com quem o jogador fala. |
name | Usado para definir o nome do objetivo da quest, seja um NPC, um item personalizado, ou uma arena. Apenas para fins visuais. |
itemName | Usado apenas com FETCH_ITEM – Esta definição altera como o nome do item aparece no rastreador de quests. Permite-te apresentar um nome personalizado diferente do nome real do item no jogo. |
Repara que cada campo de Objetivo Personalizado é separado por um : !
customRewards
Define as recompensas da quest.
| Key | Values | Default |
|---|---|---|
customRewards | Formato universal de loot do EliteMobs | nenhum |
Exemplo
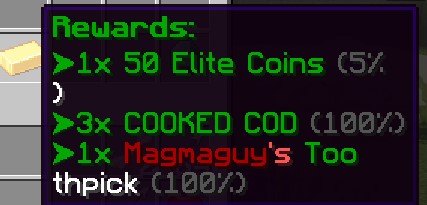
customRewards:
- currencyAmount=50:amount=1:chance=0.05
- material=COOKED_COD:amount=3:chance=1.0
- filename=magmaguys_toothpick.yml:amount=1:chance=1.0
Nota: Se não especificares customRewards, o sistema de quests gerará automaticamente recompensas com base no nível da quest. A qualidade da recompensa escala com a dificuldade da quest e inclui tanto moeda como itens. Para um controlo preciso das recompensas, especifica sempre customRewards explicitamente.
questAcceptPermission
Define a permissão que o jogador tem de ter para poder aceitar a quest.
| Key | Values | Default |
|---|---|---|
questAcceptPermission | String | nenhum |
Exemplo
questAcceptPermission: elitequest.my_permission
questAcceptPermissions
Define as permissões que o jogador tem de ter para poder aceitar a quest.
| Key | Values | Default |
|---|---|---|
questAcceptPermissions | String List | nenhum |
Exemplo
questAcceptPermissions:
- elitequest.my_previous_quest_one.yml
- elitequest.my_previous_quest_two.yml
questLockoutPermission
Define a permissão que o jogador receberá ao completar a quest, a qual o impedirá de voltar a fazê-la. Se não for especificada, a permissão de bloqueio da quest é gerada automaticamente como elitequest.[filename].
| Key | Values | Default |
|---|---|---|
questLockoutPermission | String | elitequest.[filename] |
Exemplo
questLockoutPermission: elitequest.my_quest.yml
questLockoutMinutes
Define quanto tempo, em minutos, o jogador terá de esperar antes de poder voltar a fazer a quest (funciona removendo a permissão de bloqueio da quest).
| Key | Values | Default |
|---|---|---|
questLockoutMinutes | Integer | -1(nunca se repetirá) |
Exemplo
questLockoutMinutes: 60
name
Define o nome da quest. Aceita Color Codes.
| Key | Values | Default |
|---|---|---|
name | String | [filename] |
Exemplo
name: "&aMy Great Quest Name"
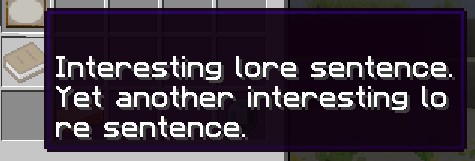
questLore
Define a descrição (lore) da quest que aparecerá no menu de quests no jogo.
| Key | Values | Default |
|---|---|---|
questLore | String List | nenhum |
Exemplo
questLore:
- "Interesting lore sentence."
- "Yet another interesting lore sentence."
temporaryPermissions
Define as permissões atribuídas ao jogador até que ele entregue a quest.
Se estiveres a usar esta definição para garantir que um item só cai quando os jogadores têm uma quest específica ativa, também terás de configurar a Mesma Permissão no ficheiro de configuração do item.
| Key | Values | Default |
|---|---|---|
temporaryPermissions | String List | nenhum |
Exemplo
temporaryPermissions:
- elitequest.item_that_should_drop_only_during_quest.yml
questAcceptDialog
Define o diálogo que aparece no chat ao aceitar a quest.
| Key | Values | Default |
|---|---|---|
questAcceptDialog | String List | nenhum |
Exemplo
questAcceptDialog:
- "My hero! You are so helpful!"
- "I wish you the best of luck!"

questCompleteMessage
Define o diálogo que aparece no chat ao completar a quest.
| Key | Values | Default |
|---|---|---|
questCompleteMessage | String List | nenhum |
Exemplo
questCompleteMessage:
- "My hero! You have completed my difficult quest!"
- "As a reward you can have this loaf of bread!"

questCompleteCommands
Define os comandos que serão executados ao completar a quest. Suporta placeholders: $player para o nome do jogador, e $getX, $getY, $getZ para as coordenadas da localização do jogador.
| Key | Values | Default |
|---|---|---|
questCompleteCommands | String List | nenhum |
Exemplo
questCompleteCommands:
- say $player has finished a quest at $getX, $getY, $getZ!
- give $player diamond 1
![]()
turnInNPC
Define o nome do ficheiro do NPC com quem os jogadores precisam de falar/interagir para completar a quest. Este não tem de ser o mesmo NPC que entregou a quest.
| Key | Values | Default |
|---|---|---|
turnInNPC | Filename | nenhum |
Exemplo
turnInNPC: my_cool_quest_npc.yml
Doadores de Quests
Para atribuir uma quest a um NPC que a dará aos jogadores, precisas de configurar o ficheiro do NPC, não o ficheiro da quest.
No teu ficheiro de configuração do NPC (~/plugins/EliteMobs/npcs/), adiciona:
questFileName: my_quest.yml
Para NPCs que dão várias quests:
questFileName:
- quest_one.yml
- quest_two.yml
Consulta a documentação de criação de NPCs para mais informações sobre como configurar NPCs.
trackable
Define se a quest usará o rastreador de quests.
| Key | Values | Default |
|---|---|---|
trackable | Boolean | true |
Exemplo
trackable: true
questLevel
Define o nível da quest. Isto é apenas um guia visual para que os jogadores saibam quão desafiante a quest será. Isto não modifica de forma alguma os níveis de bosses, itens ou outros.
| Key | Values | Default |
|---|---|---|
questLevel | Integer | 0 |
Exemplo
questLevel: 10
questAcceptSound
Define o som que toca quando uma quest é aceite. É possível tanto tocar sons do Minecraft como tocar sons de um resource pack.
| Key | Values | Default |
|---|---|---|
questAcceptSound | String | nenhum |
Exemplo
questAcceptSound: entity.experience_orb.pickup
questCompleteSound
Define o som que toca quando uma quest é completada (entregue). É possível tanto tocar sons do Minecraft como tocar sons de um resource pack.
| Key | Values | Default |
|---|---|---|
questCompleteSound | String | nenhum |
Exemplo
questCompleteSound: entity.player.levelup
Suporte de Localização
Os seguintes campos suportam localização para servidores multilíngues:
namequestLorequestAcceptDialogquestCompleteMessage
Isto permite-te fornecer traduções para diferentes idiomas no teu servidor.
Permissões
Como mencionado nas tabelas acima, as permissões são normalmente Strings ou String Lists. Mas vamos entrar em mais detalhe sobre como vais usá-las para bloquear e desbloquear quests.
Digamos que estás a criar a quest_3 numa série de quests que planeaste e não queres que os jogadores possam aceitar a quest_3 antes de terminarem a quest_2. Configuraríamos o ficheiro da quest assim:
questAcceptPermission: elitequest.quest_2.yml
questLockoutPermission: elitequest.quest_3.yml
Ao definir o questAcceptPermissions como elitequest.quest_2.yml impedimos agora os jogadores de aceitar a quest_3.yml antes de terminarem a quest_2.yml.
Ao definir o questLockoutPermission como elitequest.quest_3.yml impedimos os jogadores de poderem voltar a receber essa quest enquanto já a tiverem no seu rastreador ou se já a tiverem terminado. Isto impede os jogadores de poderem repetir a quest.
Caso queiras criar uma quest que só fica disponível depois de os jogadores terem completado uma série de quests, então configurarias o ficheiro da quest assim:
questAcceptPermissions:
- elitequest.quest_2.yml
- elitequest.quest_3.yml
- elitequest.quest_4.yml
Se quiseres que os jogadores só possam saquear determinados itens quando têm a quest correta ativa, então podemos fazer isso usando temporaryPermissions. Criaríamos uma permissão no ficheiro da quest usando temporaryPermissions e depois criaríamos uma permissão correspondente no ficheiro do item usando permission.
Por exemplo, abriríamos o nosso ficheiro de quest e adicionaríamos o seguinte:
temporaryPermissions:
- elitequest.my_cool_item.yml
Depois abriríamos o ficheiro do item, no nosso caso my_cool_item.yml, e então adicionaríamos o seguinte:
permission: elitequest.my_cool_item.yml
Ambos os ficheiros têm agora permissões correspondentes, o que deverá agora fazer com que o nosso item só caia quando os jogadores têm a quest correta ativa.
Quests Dinâmicas
As Quests Dinâmicas são quests geradas proceduralmente que são criadas e atualizadas automaticamente pelo EliteMobs. Ao contrário das quests personalizadas definidas em ficheiros de configuração, as quests dinâmicas não requerem configuração manual e adaptam-se à progressão de cada jogador.
Como Funcionam
- Tier da Quest: O tier de quests dinâmicas de um jogador deriva do seu nível de combate:
tier = combatLevel / 5, limitado a um intervalo de 1 a 20. Por exemplo, um jogador com nível de combate 45 receberá quests dinâmicas de tier 9. As próprias quests (e as suas recompensas) escalam com o nível de combate real do jogador, que é limitado a um intervalo de 1 a 100. - 3 Quests Por Tier: Para cada um dos 20 tiers de quests, o sistema gera exatamente 3 objetivos de quest aleatórios de cada vez. São oferecidas aos jogadores as 3 quests correspondentes ao seu tier atual.
- Ciclo de Atualização Automática: O conjunto de objetivos de quests dinâmicas é regenerado a cada 60 segundos (a cada 1200 ticks). Quando o conjunto é atualizado, novos objetivos substituem os antigos, dando aos jogadores uma seleção rotativa de tarefas.
- Adaptação a Masmorras Dinâmicas: Quando um jogador entra numa masmorra dinâmica com uma seleção de nível específica, todas as suas quests dinâmicas ativas adaptam-se para corresponder ao nível dos mobs da masmorra. O nível da quest, os objetivos e o nome apresentado são atualizados em conformidade para que as quests se mantenham relevantes para o conteúdo da masmorra.